Microduct Tips and Tricks

Broadband and cable operators must always look for ways to improve their network architecture. With new technologies and cloud-based systems becoming standardized, there will be continuing demand for data among companies.
Whether your business is looking to integrate microducts into your network or trying to learn how to install it, you'll need to know a few things before you proceed.
Contact Us
What Are Microducts?
You can define microducts as tiny conduits that house microcables. It's possible to use them in fiber-to-the-business, fiber-to-the-home, backhaul, long-haul, premise fiber deployments and most locations where conduit installations traditionally occur.
Why Do Companies Use Microducts for Fiber Installation?
Microducts are excellent options for companies that always need to be on the cutting edge of speeds and capacities. They can come pre-installed inside a larger conduit, ready for use. It's also easy to push them into any conduits that are already in place. Along with being compatible with a single-duct configuration, they can come in multiple units or arrays.
Some operators may claim to be able to pull standard cables into existing conduits to meet the needs of customers. While this is true, eventually the pulling of additional cables will often become difficult. Microducts provide a more space-efficient option for companies to choose from when trying to meet the desires of their customers.
Consider, as well, that microducts give operators the ability to deploy as many as 144 fibers. Along with their impressive capacity, their design allows future expansion and use. By installing microducts, you are also installing additional pathways that can play a role in inevitable growth down the road. If a company is looking to stretch cables over a large building or complex, operators can couple microducts to stretch cables longer than they would be able to on their own.
Along with being able to stretch cables over thousands of feet, installers will be able to place the microcables that use microducts much faster. It's possible to jet the newest cables at over 200 feet per minute. The new, small cables need less enclosure space, which opens up their use in most pedestals and vaults. As they can fit almost anywhere, operators will not have to waste time trying to make adjustments or use other materials to make cables fit.
By being able to install these cables quickly and upgrade in the future with ease, companies will save time and money. Additionally, companies can be confident that they are ready for whatever the future throws at them. With the ability to push fiber deeper into networks at unprecedented speeds, microducts are sure to provide results that improve a company's offerings.
Contact Us
How Adding Microducts to Your Fiber Optic Network Can Benefit You
If you're interested in adding microduct to your fiber network, there are several ways it can benefit your business.

- Smart use of space: If you have unused space in your ducts, fill it with microducts that can transform your business for the better. Instead of ignoring the opportunity the space provides, install microducts to take your network's capacity to the next level.
- Expand your fiber network: With microducts, you will be setting yourself up to expand your network in the present, as well as down the road. With a straightforward installation process, your network will be ready to take on any demands you throw at it.
- Increased bandwidth: When you'll have a more expansive fiber network, you'll be able to increase bandwidth speeds whenever the need arises.
- Convenient upgrades and installation: With the easy installation and upgrade process, you'll never feel like you need to install more fiber-optic cables than you require. If you eventually upgrade, it will be a snap to expand, but until then you can avoid making overly ambitious installations, saving time and money.
- Cost savings: The ease of installing a microduct and connecting it to microcables is a straightforward process that will save you money. Additionally, you won't have to pay outrageous upgrade costs like with more traditional methods. Microducts also prepare companies for the future, allowing them to stick to a plan of expansion, which provides for cost-effective proactive spending, rather than reactive spending.
Contact Us
Microduct Fiber Optic Cable Installation
There are primarily four ways to install direct buried microducts:
- Using a machine or hand to excavate an area and install them directly into the ground
- Placing it into a slot-cut or micro trench
- Using a mole plow
- Integrating it into an existing duct
Before you begin any of these installations, you will want to use a manufacturer-supplied tube cutter to cut the microduct. Do not use any other cutting tool. Next, you need to make sure a sealing plug covers both ends of the microduct. Putting this in place will prevent any water or dirt from contaminating the duct and possibly causing damage. Finally, you want to check to see if you've trapped the drawcord with the sealing plug.
1. Direct In-Ground Installations
Either manually or with a machine, you will excavate a trench to have a place to install the microduct. Place the microduct into the excavated ground and cover the trench back over with the soil you originally removed. Though it's a relatively simple installation, you can take the following tips as a guide the next time you want to use a direct in-ground installation.
- Ensure you have buried the microduct deeply enough to not come into contact with tree roots, rodents, freezing groundwater or other utilities.
- Avoid having an uneven trench. For easy installation, it should be level, so the microduct sits completely flat. Similarly, try not to have sharp bends present in the duct, for easy fiber installation.
- Prevent damage from stones by placing a layer of clean fill at the bottom of the trench. This filling will help the microduct avoid sharp objects. Additionally, when filling in the rest of the trench after installing the microduct, fill the sides or above the microduct to prevent loose debris from landing directly onto the cabling and possibly causing damage.
- Support the microduct by installing an access box, which will allow the microduct to keep its alignment where it passes through.
2. Micro Trench Installations
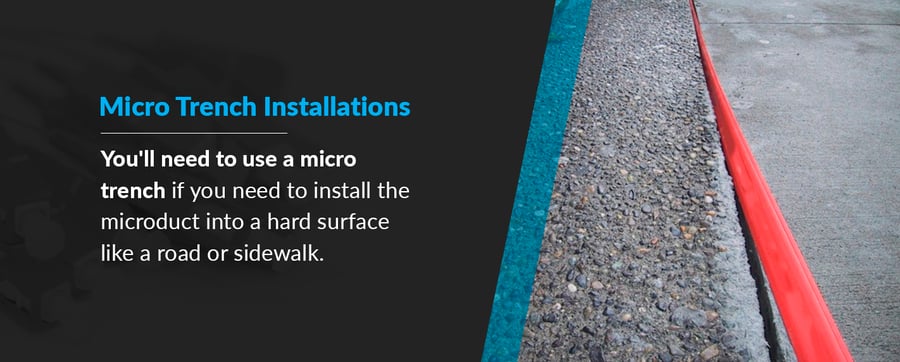
You'll need to use a micro trench if you need to install the microduct into a hard surface like a road or sidewalk. In these sorts of installations, you will hollow out a small trench in the surface, then use it to install the microduct wand cabling.
- Clear all sides of the slot trench of any kind of debris. Along with clearing debris, you'll want to make sure to dry the trench if any liquid has entered it.
- Level the bottom of the trench so the microduct can sit flat. Along with flattening the trench, try to avoid including any bend in the ducts. Following both of these tips will make the microduct easier to install.
- Protect the microduct by including a shallow layer of soft filling at the bottom of the trench to avoid damage from stones. While you backfill, make sure to do so above the microduct to prevent harm. If you're especially concerned about damage, you can install a backer rod above the backfill.
3. Mole Plow Installations
A mole plow attaches to a tractor or excavator to cut into the ground with speed and precision. While the plow opens the ground, it will feed the microduct into it.
- Make sure the ground is even, so the microduct stays level.
- Check that any bends in the route are smooth and wide.
- Only use a mole plow when no hard surfaces are present.
- Use a vibrating plow if there are roots and small stones present.
- Select a plow that holds the microduct with it. Without the machine automatically placing it in the hole, you'll leave it vulnerable to damage.
4. In-Duct Installations
If you already have larger ducts installed, you'll need to take several steps before you can install the microduct.
- Check that there's enough space in the duct.
- Compensate for the stretching that will occur as the microduct goes into the duct by letting there be some extra length.
- Ensure there's enough space for the microduct to expand if the temperature is high.
- Do not restrain the microduct until after 24 hours have passed. This wait will allow for the microduct to reach the same temperature as the jointing chamber and duct.
- Avoid the microduct twisting while it gets pulled into the duct by using a swivel.
- Distribute the pulling force over the initial section of the microduct with a pulling sock.
Contact Us
Other Microduct Tips and Tricks
As you install microducts or have a company install them for you, you may want to be aware of various tips and tricks for optimal installations. Below are some essential things to keep in mind.
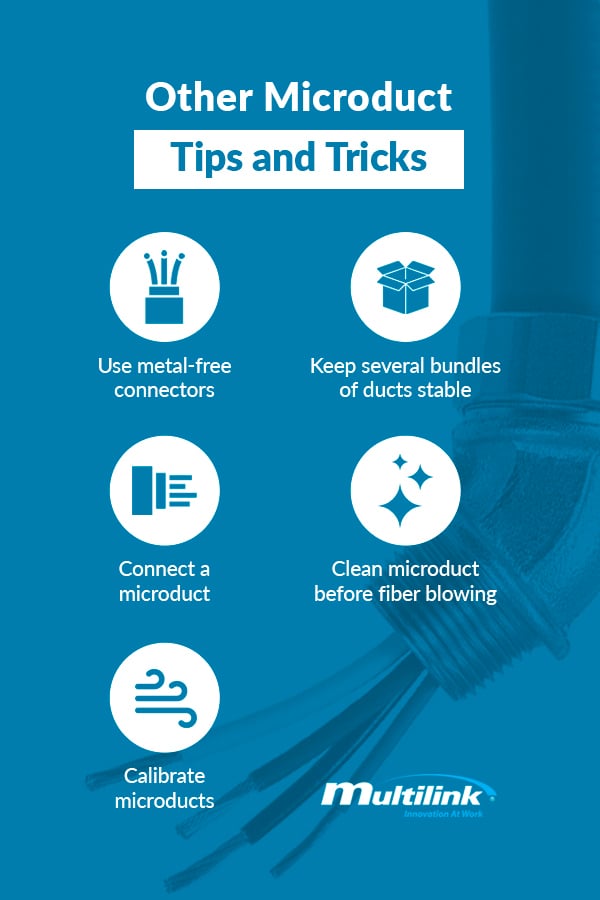
- Use metal-free connectors: If you have a fiber-to-the-home microduct system, you'll want to use a metal-free connector. An ideal connector body will be made out of polypropylene that contains no metal parts. It should be a "push-and-connect" connector. When installing, you'll want to chamfer the outside and inside of the duct end, so you can attach the connector to the duct. Push the duct into the connector until it reaches the middle barrier. Repeat the same process on the other side. Pull each side of the duct to ensure a secure connection.
- Keep several bundles of ducts stable: For fiber blowing, you have to keep your ducts straight. If you have a collection of bundles, you can use zip ties to hold them together and keep them steady. Or, you can use heavy-duty tape to keep ducts from coming apart. Either of these options will allow you to place ducts straight into a trench without any of them slipping from the bundle.
- Connect a microduct: Clean both sides of the duct. Next, use a bevel tool so the optical cables have free passage throughout the installation progress. Install the straight connector, ensuring the ends of the microducts don't overlap with each other. Cut microducts at a straight right angle to enable a connection. Match each end of the ducts so they will fit together. Finally, attach them with connectors.
- Clean microduct before fiber blowing: Preparing for a fiber installation will require clean microducts. Use a fiber blowing machine with a steady flow of air to blow a lubricant-coated sponge through the microduct. After inserting the sponge, place the fiber-optic cable that carries the air. Finally, turn on the air, and the sponge should shoot through the other side, cleaning the microducts along the way.
- Calibrate microducts: You'll want to calibrate a duct to make sure passage is optimal. First, put ducts under pressure for a few minutes to detect any damages to the microducts. Next, insert a probe into the tubing and push it forward with compressed air to check if subducts are useable. The probe will let you know where you need to make repairs and if further installation of small microduct fiber will be possible.
Contact Us
What You'll Need to Install Microducts
Installing microcables requires you to be aware of a couple of products that will help your process go smoothly.
- Microducts: To install a microduct, you'll, of course, need a microduct that meets your needs and specifications. For example, the Super Slic Plus Microduct™ has a flexural strength of 11,000 psi and a cable length of 1,000 feet. Additionally, the outer diameter is .38 inches, and the inner diameter is .22 inches, making it fit almost anywhere. It also has a bend radius of six inches, making it a valuable, semi-flexible duct. Generally, you'll purchase these ducts on a large spool for easy unraveling and installation.
- Microduct accessories: You will also need to purchase a microduct coupler if you want to connect any microducts. This product allows you to extend your ducts as far as possible. Along with the coupler, you'll need to own a duct cutter, so you can make clean cuts on your ducts. Whenever you need to match up two microducts for connection, you'll need a cutter on hand.
- Tracer wire: If you are installing buried microducts and need to keep track of them, you'll need to purchase a microduct that comes with a tracer wire. This wire will let you locate your ducts from the ground.
Ready to Install Microducts for Your Fiber Optic Network?

If you're ready to add microduct cabling to your network to increase bandwidth and set yourself up for the future, Multilink has the products for you.
Explore our Microduct Products Today!
Multilink has committed to quality in everything we do, so we can exceed customers' expectations every day. As such, one of our representatives will be happy to speak with you and discuss how we can meet your needs with our products. Consider giving us a call or sending us a message soon!
Back to Multilog

 440.366.6966
 440.366.6966